


Start embroidery: A simple free embroidery pattern with the embroidery stitches explained!
Are you unsure whether you want to purchase an embroidery kit? Or are you curious how I explain embroidery patterns in the embroidering manual? Below is a simple example!

Embroidery pattern
This embroidery pattern is super simple and perfect for beginners. You only need 2 stitches and can embroider the flowers on almost any type of fabric. So also on, for example, a tote bag or t-shirt! In this example I cut up an old pillowcase and used it as fabric because I liked the color so much. You can do this too! Take a look at your old clothes or other fabrics and there will probably be a nice color to embroider on. So you actually don’t need any embroidery fabric at all!
Embroidery thread
I used embroidery thread from the starter kit in colors 783 and 738. I didn’t unravel the threads and used all 6 threads. A string of embroidery thread consists of 6 different loose threads that are twisted around each other. In my patterns I sometimes want to create some relief and I do that by, for example, embroidering an outer line with all 6 threads, but details in the pattern with only 2 threads. For example, the outer thick line is more present than the smaller details.
Embroidery stitches
The stitches I used in this pattern are called the “lazy daisy stitch” and the “french knot” here’s how to make them:
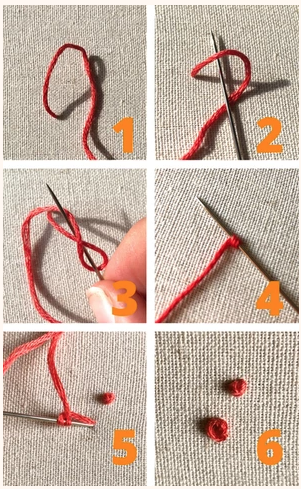
French knot
You have thread attached to your needle and pull it through the back of the fabric so that it comes out from the front (step 1). Then you pull the needle through the loop of the thread (step 2) (which is still attached to the needle, this is not clearly visible in the photo). Then wrap the thread around the needle one more time (step 3) and pull the thread tight (step 4). Then you put the needle through the cloth again in about the same place and pull the thread tight (step 5). And then you have the french knot!
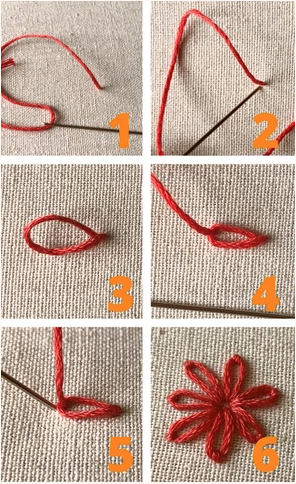
Lazy daisy
This stitch is ideal for making petals. You start in the middle by pulling a stitch from the back to the front (step 1). Then, at about the same spot where you just pushed your wire forward, go back to the back to the end of your blade (step 2). Do not pull the thread tight yet! Make sure there is a loop on the cloth as shown in picture 3. Then insert your needle forward inside the loop and pull the thread tight (step 4). Then insert your needle back outside the loop again (step 5). Pull the thread tight and you’re done! Now you can go back to the center to make another such leaf.
Line pattern
You can use the line pattern below as a background for tracing the pattern onto your canvas. With a water-soluble marker you can draw a design on your canvas. This is included in the starter embroidery kit and can also be purchased separately. You can print out the line drawing of the patterns, stick it on the window and then trace over it on your fabric. You can also open the drawing on a large screen (such as a laptop or iPad) with the brightness at its highest. Then you put your fabric over it and you can also see the lines through the fabric, which you can then trace. If it’s not completely neat, that’s no problem, you can wash the blue marker when you’re done by holding the cloth under the tap and then you won’t see it anymore! Don’t have a water-soluble marker? Pencil could also work, but make sure you make very light lines otherwise you might see it and that would be a shame! The pattern does not have to be drawn 1 on 1, I also used it as a kind of separate guide, because I wanted more flowers in different sizes and so I took 1 flower from the pattern and then I stubbornly continued to embroider at my own discretion. although I had just drawn this pattern myself 5 minutes before to trace it all over 😅
Embroidery
Normally there is now an overview in the guide with an image of the finished embroidery and arrows with which stitch was used where, what color embroidery thread, and how much thread was used. This actually speaks for itself because the pattern is so simple! The 3 red dots in the middle are made with the french knot and the leaves with the lazy daisy stitch (explained above). I used all 6 yarns and the center piece is in color 783 and the leaves in color 738, I finished the embroidery thread used the starter embroidery kit.