


What's in a starter embroidery package and why do you need it?
What's in a starter embroidery kit and why do you need it?
For example embroidery patterns, thread, embroidery hoops, fabric and other accessories can’t miss from an embroidery kit!
Needle threader
With a threader you can easily thread the yarn through your needle. First you put the iron through the eye of the needle. Then you pull the wire through the iron of the needle threader. Then carefully pull the needle threader back through the eye of the needle. Wiggle a little back and forth if it doesn’t work right away. Is the thread through the needle? Then don’t put a knot in it! You can just leave the thread hanging loose, otherwise the thread will not go through your cloth without difficulty.
Water soluble marker
With a water-soluble marker you can draw a design on your canvas. You can do this freehand yourself or use one of the patterns included in the kit. You can print out the line drawing of the patterns, stick it on the window and then trace over it on your fabric. You can also open the drawing on a large screen (such as a laptop or iPad) with the brightness at its highest. Then you put your fabric over it and you can also see the lines through the fabric, which you can then trace. If it’s not completely neat, that’s no problem, you can wash the blue marker when you’re done by holding the cloth under the tap and you won’t see it anymore!
Embroidery patterns & embroidery stitches explained
When you first get started with embroidering, it is useful to know what stitches there are, so you can immediately start with a number of patterns. The manual in this embroidery kit includes an overview of all basic embroidery stitches. These are explained on the basis of images and text. The manual also includes 10 free embroidery patterns. These are ordered from easy to difficult, so as a beginning embroiderer you can always choose a slightly more difficult pattern. I draw the embroidery patterns myself and embroider all the examples myself. It is not allowed to share the embroidery patterns and explanations in the manual with third parties. They are owned by Daffy’s.
Embroidery fabric
The starter embroidery kit also comes with cotton embroidery. This fabric is not suitable for cross stitch embroidery, but for the modern version of embroidery with very detailed embroidery patterns. The fabric is easy to attach in the embroidery hoops and you will also easily be able to push your needle and thread through it.
Embroidery thread
The embroidery threads in the embroidery kits are specially selected by us for quality and ease of use. We have tested different types of embroidery threads but in the end these came out as the clear winner. There is a very nice variety of colors and the embroidery threads do not unravel quickly.
Embroidery hoops
We work with both bamboo embroidery hoops and beechwood hoops in our packages. Both are durable and have a beautiful appearance. The beechwood embroidery hoop is only more luxurious in terms of color and finish. The beechwood embroidery hoop, for example, has a gold brass clasp, the bamboo hoop does not have this and is slightly more susceptible to splinters.
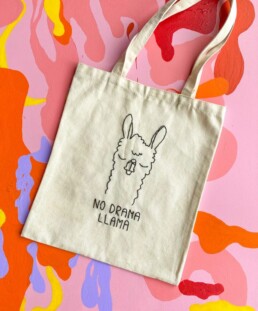
Get started with embroidering a bag yourself!
Bag embroidery supplies
To embroider a bag, you obviously need the bag itself. A cotton tote bag is the easiest because the fabric resembles normal embroidery fabric! You will also need:
- An embroidery hoop for tightening the fabric you want to embroider on
- A water-soluble marker, also known as a pattern drawing marker. You will need this to draw your embroidery pattern on the tote bag!
- Embroidery thread, you can choose different colors yourself or buy a complete embroidery kit that already includes these.
- Needle set & thread piercer for easy attachment of your thread to a needle.
- You also need an embroidery pattern, you could draw one yourself, use a free embroidery pattern or the patterns included with the complete embroidery kit.
Do you already know something about embroidery? Then I don't have to explain embroidery stitches anymore, but if you are a beginner it is useful to also have a manual that explains all embroidery stitches with pictures. Such a manual is included with these embroidery kits and can also be downloaded separately! In this blog I explain 2 simple embroidery stitches, the lazy daisy stitch and the french knot.
What should you take into account when embroidering a bag?
A common mistake is that you insert your needle too far and pull it back without realizing that you have now also embroidered the back of your bag. So always work with one hand in the bag so you can feel whether things are going well! When finishing the threads you should also make extra good knots and have as few loose pieces as possible. It is of course the intention that the bag is actually used and if there are all kinds of loose hanging threads, your embroidery will break much faster! Washing the bag is also one thing, it is possible but I would recommend putting it in a laundry bag. This way you run the least risk of damaging your embroidery.
I would say, give it a try! Embroidery itself is a super nice relaxing job and you can make really nice things with it and now you also have a nice usable handmade item :) With a complete embroidery set you can also start right away, ideal!

Studies prove it: Embroidery is good for your mental health! 5 advantages at a glance
Studies prove it: Embroidery is good for your mental health! 5 advantages at a glance
Embroidery has a relaxing and stress-relieving effect, you will probably have heard that before. But now there is a real study that provides evidence and what does it show? People who start embroidering experience less stress-related complaints than before and there is a whole further laundry list of benefits. So let’s go and buy an embroidery kit!
The advantages of embroidery at a glance:
– Stress relieving
– Lowers your blood pressure
– Develops your creativity
– Relieves feelings of anxiety
– It boosts your brain function
Because you are concentrated when embroidering, but at the same time you perform precise work in which you use both your hands and your eyes, these parts of your brain are trained at the same time. The reason doctors often give patients with brain damage similar brain exercises is because it turns out to be a super good exercise for the brain. It stimulates hand-eye coordination and at the same time works to improve your concentration. Brains can be trained just like muscles and embroidery is a very nice exercise for your brain, just like push ups would be for your muscles, for example!
When you are focused on something, you forget the world around you, as it were. This is exactly what the purpose of embroidery is. When you are working with needle and thread your brain has to focus on a number of different things such as controlling your hands, thinking about next stitches etc. this ensures that there is no room For thinking about other bad things because you are doing something at that moment that is stimulating enough to ‘turn off’ all other thoughts. At that moment there is simply no room for anxious feelings or stress. This is also reflected in the levels of the various ‘bad’ stress hormones in your blood. After a handicraft activity such as embroidery these appear to be significantly lower. Embroidery is even included in the UK government program to help people with mental health problems!
Besides the fact that there are all kinds of physical and mental benefits, you also develop your creativity. I believe that everyone is creative, you just have to take your time! Everyone can make their own cool embroidery pattern or match beautiful colors of embroidery thread with each other. It’s a matter of taking the time and really believing that you can do it. Many people drop out in advance with the words “yes, but I’m not creative at all”. Really! Everyone is creative in their own way, because yes, what art is, that’s just a matter of taste. Embroidery is therefore just like a job, the more often you do it, the better it will succeed. Those embroidery stitches will look a bit neater every time until you don’t even need a pattern or manual anymore because you already know them all by heart! So just start with it, I recommend a starter cross stitch kit but I might be a bit biased ;).
Creativity and high sensitivity
Through this website about high sensitivity I also found out that creativity in general is very good for people who are highly sensitive. Being creative is a good source of energy, especially for the highly sensitive brain that is often very creative but can no longer pay attention to it due to overstimulation. The best advice is – break the circle! Just start and you will see how beautiful things can eventually arise naturally and it brings you a lot of peace.
Sources
The study on the benefits of embroidery for your mental health was done at the University of Brighton by Heidi Von Kurthy. Here’s the link if you want more information! https://cris.brighton.ac.uk/ws/portalfiles/portal/21618800/von_Kurthy_final_thesis.pdf
This text also refers to other studies on the benefits of embroidery.

Start embroidery: A simple free embroidery pattern with the embroidery stitches explained!
Start embroidery: A simple free embroidery pattern with the embroidery stitches explained!
Are you unsure whether you want to purchase an embroidery kit? Or are you curious how I explain embroidery patterns in the embroidering manual? Below is a simple example!

Embroidery pattern
This embroidery pattern is super simple and perfect for beginners. You only need 2 stitches and can embroider the flowers on almost any type of fabric. So also on, for example, a tote bag or t-shirt! In this example I cut up an old pillowcase and used it as fabric because I liked the color so much. You can do this too! Take a look at your old clothes or other fabrics and there will probably be a nice color to embroider on. So you actually don’t need any embroidery fabric at all!
Embroidery thread
I used embroidery thread from the starter kit in colors 783 and 738. I didn’t unravel the threads and used all 6 threads. A string of embroidery thread consists of 6 different loose threads that are twisted around each other. In my patterns I sometimes want to create some relief and I do that by, for example, embroidering an outer line with all 6 threads, but details in the pattern with only 2 threads. For example, the outer thick line is more present than the smaller details.
Embroidery stitches
The stitches I used in this pattern are called the “lazy daisy stitch” and the “french knot” here’s how to make them:
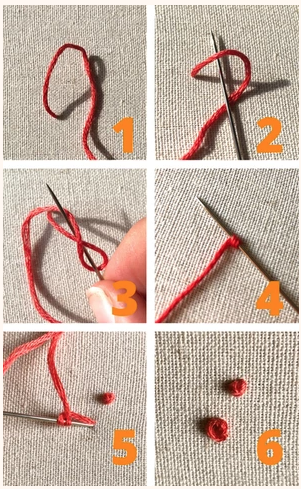
French knot
You have thread attached to your needle and pull it through the back of the fabric so that it comes out from the front (step 1). Then you pull the needle through the loop of the thread (step 2) (which is still attached to the needle, this is not clearly visible in the photo). Then wrap the thread around the needle one more time (step 3) and pull the thread tight (step 4). Then you put the needle through the cloth again in about the same place and pull the thread tight (step 5). And then you have the french knot!
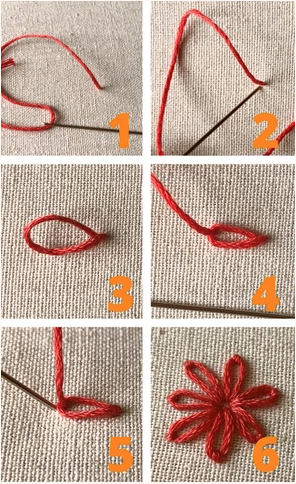
Lazy daisy
This stitch is ideal for making petals. You start in the middle by pulling a stitch from the back to the front (step 1). Then, at about the same spot where you just pushed your wire forward, go back to the back to the end of your blade (step 2). Do not pull the thread tight yet! Make sure there is a loop on the cloth as shown in picture 3. Then insert your needle forward inside the loop and pull the thread tight (step 4). Then insert your needle back outside the loop again (step 5). Pull the thread tight and you’re done! Now you can go back to the center to make another such leaf.
Line pattern
You can use the line pattern below as a background for tracing the pattern onto your canvas. With a water-soluble marker you can draw a design on your canvas. This is included in the starter embroidery kit and can also be purchased separately. You can print out the line drawing of the patterns, stick it on the window and then trace over it on your fabric. You can also open the drawing on a large screen (such as a laptop or iPad) with the brightness at its highest. Then you put your fabric over it and you can also see the lines through the fabric, which you can then trace. If it’s not completely neat, that’s no problem, you can wash the blue marker when you’re done by holding the cloth under the tap and then you won’t see it anymore! Don’t have a water-soluble marker? Pencil could also work, but make sure you make very light lines otherwise you might see it and that would be a shame! The pattern does not have to be drawn 1 on 1, I also used it as a kind of separate guide, because I wanted more flowers in different sizes and so I took 1 flower from the pattern and then I stubbornly continued to embroider at my own discretion. although I had just drawn this pattern myself 5 minutes before to trace it all over 😅
Embroidery
Normally there is now an overview in the guide with an image of the finished embroidery and arrows with which stitch was used where, what color embroidery thread, and how much thread was used. This actually speaks for itself because the pattern is so simple! The 3 red dots in the middle are made with the french knot and the leaves with the lazy daisy stitch (explained above). I used all 6 yarns and the center piece is in color 783 and the leaves in color 738, I finished the embroidery thread used the starter embroidery kit.